Does implementing rel=author just make you want to throw the laptop across the room? After many hours of teeth gnashing and repeated blows to the head by my desk, I have (hopefully) created the steps below to prevent someone else from nubs that use to be teeth and cranial goose eggs. Below is a fundamental step-by-step guide of implementing your rel=author information on your website, but let’s start with a little information about it.
PageRank in 2013:
While Google won’t admit it, Google’s AuthorRank seems to have more and more influence on PageRank these days and everyone is jumping on the opportunity. When I type in my search criteria, I am amazed at the number of Google Authors already in place. Trust and integrity are becoming the SEO buzzwords of the more recent months. Including your credentials under the title of your most recent blog or site entry, adds an element of trust to your written words.
The rel=author Steps:
You must create a Google+ profile:
Add photos, information, connections, etc… but there are two very specific pieces to this puzzle that must be in place: Anemail address associated with your domain (work or personal blog) and the “Contributor to” links.
- Click on the Profile Icon on the far left of the screen just below the Google+ image.
- Click the Edit Profile button next to your profile photo.
- Scroll down to the “Work” section and enter in the phone number, email, and address etc…
- Click Save
- Click on “Contributor to”
- Click “Add custom link”
- Click Save
- Click the “Done Editing” button
- Next to your work email that was entered, click the Verify
- You will receive an email from Google and the content will look something like this:
Once your email is verified and your Google+ information is in place, you will want to “Signup for Authorship” https://plus.google.com/authorship
On Your Website:
If you are using WordPress or Joomla, there are plug-ins that you can install, but do your homework first. Check the reviews to see if they credible and without security issues.
Plain Ol’ HTML Code:
If you want to just add standard html code to your site instead follow these steps:
At the end of the code before the closing tag, type the following:
The code in Step 1 will need to be added at the bottom of each page of content.
Rich Snippets for the “Computer Nerds”:
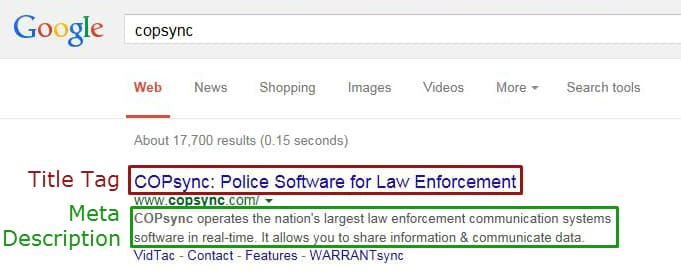
You have probably seen the following, maybe not this exact query, but something similar. A site in your search results that has extra links under the description:
These extra links to website pages are a result of implementing Rich Snippets on the page. This type of addition is more for the coding enthusiasts, but if you are up for a challenge, it can be done. This can be implemented for Products, People,Reviews and many other options. Below, I am introducing you to implementing Rich Snippets to a Products page.
First pick a format, Google is recommending Microdata nowadays because it is HTML5 compatible.
The coding is as follows:
Since you are promoting a “PRODUCT,” use the following div container:
Brand Name
Brand Info
Brand Product Number Information (This can be a SKU or Manufacturer’s Product Number, but this is highly recommended by Google)
Price of Item
Once these itemprop tags are wrapped around your PRODUCT information on the page, you can test the Rich Snippet’s implementation here:
https://www.google.com/webmasters/tools/richsnippets
And now, you wait. It takes some time for these updates to propagate in search results and Google Places pages. So in the meantime, you can read more information from Google on this subject:https://support.google.com/webmasters/bin/answer.py?hl=en&answer=99170&topic=1088472&ctx=topic
Need Specific Help?
Interested in a specific topic? Review the topics below to get the info, news, and tips you need!




![HubSpot Partner Day 2019 [Recap] 52 ADC partner day 1200x630 1](https://www.atomicdc.com/wp-content/uploads/2019/09/ADC-partner-day-1200x630-1.jpg)


![30 Awesome HubSpot Tools That Won’t Cost You a Dime [Free Inbound Marketing Tools] 56 30 hubspot tools that won't cost you a dime](https://www.atomicdc.com/wp-content/uploads/2019/06/ADC-30-hubspot-tools.jpg)


